Because I refuse to admit that summer is coming to a close just yet (even though I LOVE everything about Fall), I decided to finally take the leap and try making my own homemade ice cream. I do not have an ice cream maker, so I knew it was going to be a challenge, but that never stopped this girl. Challenge accepted….
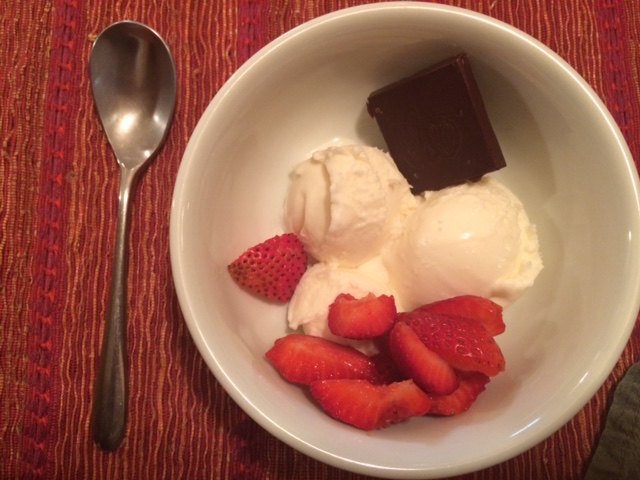
It’s hard to go wrong with pure vanilla ice cream. It’s a classic that everyone loves and it’s the perfect base for all kinds of creative flavors. You can take this recipe and mix in whatever you’d like; think crumbled candied walnuts, your favorite paleo cookie recipe (or dough), fresh fruit, almond butter. Ok my mouth is watering.
What I realized this weekend, is that it’s also the perfect ice cream for an ice cream sandwich, especially when beautifully squished between my Chocolate Chip Chewies.

So here you are, super simple, surprisingly easy classic vanilla ice cream.
Paleo Vanilla Ice Cream (GF, NF, DF)
 WHAT YOU NEED:
- 1 can of full fat coconut milk from the can
- 3 TB pure maple syrup (honey will also work here)
- 1 tsp pure, organic vanilla extract
- a pinch of celtic sea salt
- 1 TB filtered room temperature water
- 1/2 TB grass-fed Vital Proteins gelatin (the green lid is the one that gels)
WHAT YOU DO:
- warm a sauce pan over medium heat
- add in coconut milk, maple syrup, vanilla, and sea salt and stir continuously until combined and at a low boil
- mix 1 TB of water with 1/2 TB of collagen until you have an even jelly consistency
- drop the gelatin mixture into the saucepan and stir until all combined
- once dissolved, pour mixture into a glass bowl and set in a larger bowl filled with ice water to cool (about 15 minutes)
- once cooled, cover and place in the fridge for a couple of hours to cool entirely and to let the flavors meld nicely
- after 2 hours, move to the freezer
- after 2 hours, remove from freezer and mix with an electric hand mixer for 1-2 minutes until creamy and use a spatula to push ice cream down from the sides of the bowl
- after 2 more hours, repeat this step with the hand mixer and then transfer to a glass tupperware or tightly covered bowl to continue freezing*
- let freeze for at least 1 more hour and then ENJOY!!
*This is where you would fold in any additions you might want in your ice cream
See that? Not so difficult. If you make this, let me know what you think, and don’t forget to post a picture and tag @laura.radicalroots! I love to see my recipes recreated.
♡ Laura

[…] We topped it with vanilla ice cream, and enjoyed every last […]
This was easy to make and tasted great with a homemade blackberry syrup.
Thanks for the great feedback and for sharing on IG! Your picture was beautiful ♡